Wednesday, October 7, 2015

Pasta with Fresh Tomato Sauce

 Our biggest tomato EVER--yes, it really does read 35.6 oz!!

Obviously it was a good tomato year and we are still harvesting, the nights are cool but we have not had a killing frost yet!  Most unusual.  I have two dozen quarts of tomatoes preserved and tucked in the pantry and have been eating tons of tomatoes.  Tomatoes in everything!  But before it gets real crazy here, expecting over 20,000 tulip bulbs later today, I wanted to share my favorite fresh tomato dish.  This pasta is so flavorful, it really celebrates the tomato and it comes together in a flash...and if your basil hasn't frozen it is TDF.

Unless you have a two pound tomato like the beauty above you will need four to six of your favorite tomatoes.  You can mix varieties, heirloom, yellow, whatever you have that is fresh and vine ripened.  Wash and core the tomatoes and cut them into a small dice, about 1/2 inch and put them into a large bowl with all their juice and seeds.   You need approximately 2 cups of tomatoes--being a lazy cook I don't measure, after making this dish for years and using the same bowl I just know what looks right.  Just don't worry too much, use what you have.  A small adjustment with the olive oil will put it all right.  No worries.

This dish is all about personal preference so taste as you go.  Salt the tomatoes, start with 1/2 teaspoon, give it a good stir and let it rest while you prep the garlic.  Now is also a good time to set a big pot of water on the stove to boil.  The beauty of this dish is that you can prep the sauce early in the day, letting it marinate for hours, or whip it up in the time it takes to cook the pasta.

Peel and mince the garlic, because the garlic will not be cooked I use a garlic press.  If you really love garlic then be bold and just mince it up and then revel in mouthfuls of tangy juicy tomato goodness accented perfectly with a bite a garlic.  Wow!
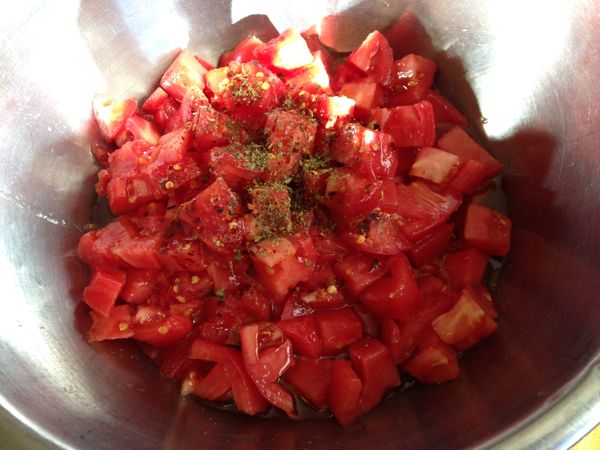

Add the garlic, freshly ground pepper, red pepper flakes and some really good extra virgin olive oil.  Stir this all together, taste it and adjust the seasoning.  (Giovanna, my friend from Milano, added oregano to all of her fresh tomato dishes so I added a good pinch of dried oregano, rubbed between my palms--to crush and release the oils.  Perfetto!)

As soon as the water is boiling add a tablespoon of salt, it is always important that pasta to be well seasoned but especially in simple dishes with a limited number of ingredients.  If the pasta is a dud so is the dish, so add the salt, it will infuse the pasta with flavor and the excess will be drained away.  For years I used a short pasta like farfalla, pene rigate or orecchiette because the it paired so well with the sauce.  I did not have any of the above so I used cappellini (angel hair) and it was perfect, so be creative.

Cook the pasta according to the directions for "al dente".  I consult the box and then set the timer a minute or two short of the recommendation and then check the pasta.  Nothing sadder than perfect sauce and limpy whimpy pasta.  As soon as the pasta is "al dente" drain it and add the steaming hot pasta to the tomato sauce and stir well to coat the pasta.  The pasta should look juicy and shiny.  If it seems a little dry add some olive oil.  Garnish with ribbons of fresh basil and serve with freshly grated parmigiano cheese.  A leafy green salad dressed lightly will complete this simple end of summer meal.  Buon appetito!


Fresh Tomato Pasta with grilled ciabatta

Pasta with Fresh Tomato Sauce

4-6 fresh tomatoes, about 2 lbs
1 large garlic clove
½ - 1 tsp salt
½ tsp freshly ground pepper
¼ - ½ tsp red pepper flakes
¼ c EVOO
2 TB fresh basil, cut or torn into ribbons

1 lb pkg pasta (farfalla, shells, linguini)

Put a large cooking pot with water to boil on high.  In the meantime wash and cut the tomatoes into small dice, about ½ inch.  Put the tomatoes, with all of their juice and seeds into a large bowl.  Peel and mince the garlic finely and add to the tomatoes.  Pour in the EVOO and add ½ tsp of salt, all the pepper and stir everything together.  Taste the sauce for salt and then let mixture marinate. 

As soon as the water is boiling add 1 TB of salt and the pasta and cook according to directions for al dente.  Stir and taste the tomato sauce and adjust the seasoning.  As soon as the pasta is al dente drain it into a sieve and add it to the sauce.  Stir and taste again for seasoning.  The pasta should look glossy, with every strand or piece enriched by oil and sauce, so another taste and adjust seasoning and oil--it is okay to add more oil.  (After just a few meals in Italy I realized that adding more oil to pasta dishes not only made them taste more authentically Italian but truly luxurious.  This dish is just tomatoes, garlic, basil and seasoning—so use a really good olive oil and be generous.  Per che no?  (That’s Italian for why not!)

Friday, September 11, 2015

Ginger Peach Coconut Crisp

Tree ripened Bindweed peaches

Big transition days here at the farm from flowers to food.  My poor kitchen has been so neglected and I have nearly forgotten how to cook--meals during farm season are very simple.  VERY simple, so each September the kitchen and I get reacquainted, this year it was gorilla style.  The day after our last delivery of the year we were expecting a cold spell that would freeze the basil so I jumped right into pesto production (post pending) and our little peach trees actually produced this year so I was up to my arm pits in peaches.  
Ginger peach pie is one of my faves but wanting something really fast, down and dirty I decided on a peach crisp--but my darling husband cannot process oatmeal.  How weird is that!  While contemplating what I could substitute I had a good rummage through my nearly empty pantry and discovered some beautiful coconut flakes.  Perfetto!
I set a pot to boil and toasted the flakes in the oven.  When they were perfectly toasted I set them to cool.  After chilling out a bit I spun them around in the food processor until they were tiny little crumbs.


As I was reaching for the butter I realized that I had coconut oil too and decided to double up on the coconut flavor with a one, two punch so I melted the butter and coconut oil together.  Then I dumped flour, sugar, salt and baking powder into the food processor with the coconut crumbs and drizzled in the butter/coconut oil and pulsed until I had some awesome looking crumbles.  Then I popped it into the fridge.


The pot I set on the stove top was bubbling away so I slipped in six perfect peaches and about 40 seconds later fished them out and plunged them into a cold water bath.  The skins slipped off in my fingers and I quartered and chopped the peaches into bit-sized chunks.  (I grease my baking pan and fill it as I go, this assures the perfect amount of fruit.   When the pan is nice and full I tip the peaches into a big bowl so I can incorporate the rest of the ingredients.  I do this with pies too so every pie is perfectly filled.)


A squeeze of lemon, sugar, corn starch, a pinch of salt and freshly grated ginger are popped in with the peaches and are stirred around. When everything is nicely mixed it all goes back into the baking pan.


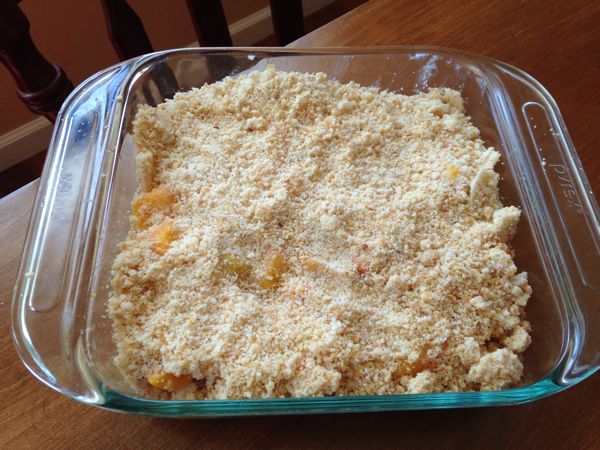
 I  crumbled the topping over the top, duh, and slipped it into the oven at 375 for about 50 minutes.  The peaches need to be bubbling and the crumbled topping toasty before the crisp is properly done.  (Have you ever had a partially cooked pie--not good.  The fruit really needs to  bubble with the sugar and corn starch or it is an epic fail.  When you see that bubbly business happening the fruit and sugars are caramelizing and that is what makes a pie or crisp or cobbler truly magnificent.  Here is where the patient and watchful cook gets the big results, keep it in the oven until it's done.)  


The photo below captures what you are looking for--the peaches in the corner have bubbled up and changed color, they have caramelized and the crumbled topping is toasty brown.  Once you witness this cooking magic, remove the crisp from the oven.


Cool the crisp slightly but it is best served warm in a large shallow bowls with icy cold fresh cream.  Holy cow--so good.  RT said it was the best thing I have EVER baked and he might be right.


Ginger Peach Coconut Crisp

Topping:
1 c. large flake coconut, unsweetened
¾ c. flour
1/3 c. sugar
½ tsp salt
¼ tsp baking powder
¼ c. coconut oil
¼ c. butter

Filling:
5-6 med. peaches
1 TB lemon juice
1/3 c. sugar
1 ½ TB corn starch
pinch salt
1 TB fresh ginger, grated finely

Topping:
Preheat oven to 375 degrees and set a large pot of water to boil on stove top.  Scatter coconut flakes over a cookie sheet and toast in oven for 5-8 minutes.  (Keep an eye on it as it will burn, coconut should be toasty brown, not black.)  Let the coconut cool and then pulse in food processor until it resembled tiny crumbs.  Meanwhile, combine coconut oil and butter in a small microwave safe container to melt, set aside and let cool a bit.  Add all topping ingredients to the food processor and pulse until the entire mixture is combined and resembles small crumbs.  Refrigerate until ready for use.

Filling:
Wash the peaches.  As soon as the large pot of water comes to a boil you are ready to slip the skins off the peaches.  Gently drop the peaches into the boiling water and let rest for 30-60 seconds.  Remove with a slotted spoon and plunge into cold water.  As soon as the peaches are cool enough to handle run a knife from the stem center around the entire peach.  The skins will easily slip off in your fingers.  Separate the peach halves, remove pit, quarter and chop the peaches into bite-sized chunks.  Put the peaches and the remaining filling ingredients into a large bowl and stir to incorporate everything.  Pour into an 8 x 8 in. square greased baking pan.  Spread the peach mixture out evenly and crumble the topping over the entire surface. 

Bake 40-50 minutes, until the peaches are bubbly and the crumbled topping is toasty.  Best when served warm with fresh cream in a large bowl with a big spoon.

Sunday, April 19, 2015

Spicy Peanut Noodles

Spicy Peanut Noodles

I've been craving peanut sauce for days and we have been way to involved on the farm to make the trek to Idaho Falls for some good Thai food--so I threw this together for lunch.  I wanted to share this recipe because most of the ingredients are in your kitchen and you can be so creative with it.  As I was prepping everything I realized the mango right in front of me was just begging to be invited and it was fabulous.  So if you have a jar of peanut butter, soy sauce, rice vinegar and some frozen peas you too can join the party.  You can have this baby on the table in under thirty minutes.

Spicy Peanut Noodles

Peanut Sauce
½ c. peanut butter
1/8 t. garlic powder
3 T sugar
¼ c. rice vinegar
3 T soy sauce
2 T sesame oil
1 T chili pepper sauce

1 lb. whole wheat thin spaghetti
2 T canola oil
1 t. sesame oil
¼ t. red pepper flakes
1 red pepper, thinly sliced
1 c. peas, blanched
1/3 c. roasted peanuts, coarsely chopped
1/3 c. cilantro, chopped

Partially fill a large pot with water for preparing pasta.  Set it to boil, in the meantime make the peanut sauce.  Place all sauce ingredients in a small bowl and whisk until smooth.  (You can use a blender, but it isn’t necessary.)

When the water begins to boil add 1 TB of salt and stir in the pasta.  Cook for the recommended time just until al dente.  Drain the pasta and run cool water over it to stop the cooking process and cool the noodles.  Drain thoroughly.  Shaking off any remaining water put the pasta in a large bowl, add canola oil and sesame oil and red pepper flakes.  Mix this until the pasta is shinny and taste for seasoning.  You may need to add a little salt—the pasta should taste nice with a hint of sesame and heat from the red pepper flakes.  Pour in half of the peanut sauce and stir it well into the pasta, repeat with the remaining sauce.  Add in the remaining ingredients and stir just until all vegetables are well incorporated.

Serve in wide open bowls, best at room temperature but also very good cold.  Refrigerate any leftovers.

**This recipe lends itself well to a variety of fresh vegetables, so get creative—cucumbers, celery, snow pea pods, etc.  Just stir in what ever is growing outside.  This would also be excellent served over a bed of spring greens.


Sunday, April 12, 2015

Mango Gelato

Mango Gelato

First question, what is the difference between ice cream and gelato.  Basically gelato has less fat, less cream and more fruit.  The ice crystal consistency is like a cross between sorbet and ice cream.  You can call it what ever you want to, just make it. It's easy and the rewards are almost instantaneous.  All you need to make beautiful gelato/ ice cream is a blender, a freezer and delicious ingredients.  So get creative.

My standard combination is 1+1+1+1+1
1 cup of fruit
1 cup of juice or water
1 cup of half and half (you can use cream or milk too)
1 cup of sugar
1 pinch of salt


For mango I used 1 cup of frozen mango chunks, a cup mango juice, a cup of  half and half, almost a cup of sugar (I usually cut the sugar, it depends on the sweetness of the fruit--I start with 1/3 cup of sugar, blend and taste and then add in 1/3 cup increments until I get the perfect sweetness), a pinch of salt and a tablespoon of fresh ginger.  I put it all in the blender and blend until it looks like the perfect smoothie and then check for flavor, making any adjustments.  

I have a beautiful Cuisinart ice cream machine that churns the gelato but you do not need one.  If you have one, use it.  If you do not have an ice cream maker pour the ingredients into a large stainless steel bowl, cover it with plastic wrap and put it in your freezer.  In an hour take the bowl out and use a whisk or fork to break up the ice cream that has frozen along the edges and work it into the center of the bowl.   Repeat this procedure every hour until your ingredients look and feel like ice cream.  It really is that simple.

Mango Gelato

1 c. frozen mango chunks
1 c. mango juice
1 c. half and half
1/3 - 2/3 c. sugar
1 TB fresh ginger, grated
1 pinch salt

Place all ingredients in a blender and blend until smooth.  Taste for flavor and sweetness.  Finish gelato in an ice cream maker or use the procedure above.
 
Home made gelato/ice cream will freeze much more solid than store prepared so remove it from the freezer for 15 min. before serving to soften it up a bit.

Friday, March 14, 2014

Ginger Shrimp Noodles

Ginger Shrimp Noodles
This dish is a winner winner--RT loves it, many of the ingredients are staple items and it comes together very quickly!  I have been making this dish for years but rice noodles do not reheat well so I often make this for small dinner gatherings.  All of the prep is done ahead and can be refrigerated, it cooks up in minutes--seriously minutes--filling the air with the tantalizing scents of ginger and garlic.  Perfect!  
This weekend I discovered a package of chop suey noodles at the back of the pantry--really, chop suey noodles--I have no idea where they came from but decided to try them in this recipe.  They were just perfect and did reheat nicely so this dish just moved up to the "Standard Weeknight Meal" category and the beauty is just about any noodle you like, or have, will be delicious.

Spicy Asian noodle sauce
This dish absolutely demands a good prep--everything goes into a hot wok systematically and within minutes--so I just prep all the components and line them up.  Making the sauce first allows the flavors to mingle and become cohesive.  Most of the ingredients are right to hand in the pantry and refrigerator:  red pepper flakes, Thai fish sauce, rice wine vinegar, soy sauce, ginger, garlic and sugar.

Once your sauce is together put a pot of water on to boil.

Parboiled peas, garlic and scallions
This is a simple recipe so each component really plays its part so in an ideal world the peas would be freshly gathered in from the garden but petite frozen peas will do.  (I will be on the look out for sugar snap peas in the produce section next week.)  Just thaw the peas out by parboiling them in the microwave for a few minutes.  Clean and chop the scallions.  The recipe calls for 1 TB of garlic divided into halves--half is for the sauce so a fine mince is best and the other half is cooked with scallions.

Thawed, brined and drained shrimp
Once your shrimp is thawed or partially thawed you might like to brine it.  Using a brine adds flavor and moisture to the shrimp.  (RT has no idea what I do in the kitchen but he always comments on the exceptionallity of the shrimp if I have brined them.)  Very simply rinse and drain the shrimp and give them a little spa treatment in a bowl of cold water and a teaspoon of salt.  Let them rest in the fridge for an hour before assembling the dish.  As you assemble the ingredients let the shrimp drain in a colander to remove excess water.  

Once you have gathered all the components prepare the noodles.  If you are using rice noodles there are instructions included in the recipe below.  If you are being adventurous just follow the instructions on the package of noodles you are using.  Take care not to over cook the noodles, they will continue cooking a bit even after draining and will cook even further in the wok--so take them off the heat and drain them when they are "al dente".

If you have a wok now is the time to use it--if not, a large saute pan will suffice.  Heat the pan over high/med. high heat and add the oil.  Just for fun I used coconut oil--it had very good flavor and the high heat did not cause any smoking.  When the oil is hot and shimmering add the shrimp.  Cook for a few minutes, flipping or stirring them to cook on both sides.  Add the scallions and ginger and cook for another minute and then add the peas and noodles.


The shrimp have only been in the pan for four minutes and they have already begun to "pink" up--a sign of doneness.
Add the sauce and cook until everything is warmed through.
 
Using tongs helps to incorporate all the ingredients.

I love the taste of fresh cilantro and enjoy more citrus than my partner so I finished the dish with minced cilantro and fresh lime wedges on the side.
 When the dish is finished, slipping the entire thing into a large warm bowl ensures that the cooking action stops and helps to distribute all the ingredients a bit more evenly.  Plate into warm shallow bowls, finish with fresh cilantro and lime and serve immediately with a smile.

Ginger Shrimp Noodles

Sauce:
1 tb. Thai fish sauce
3 tbs. soy sauce
2 tbs. rice vinegar
2 tbs. water
1 tb. sugar
1 tb. ginger, minced
pinch red pepper flakes
1 tb. garlic, minced, separated into two halves

2 tbs. canola oil
6 scallions, cut into small rounds
1 cup frozen peas
1 lb. fresh shrimp, peeled and deveined and brined*
1 lb. rice noodles**

½ cup fresh cilantro, chopped
lime wedges


This dish cooks in less than 10 min. and things go in the wok quickly so have all the ingredients prepared, lined up and ready to go.

Prepare the sauce by combining all sauce ingredients in a bowl and let marinate while you prep everything else.

Put a large pot of water on to boil.  As soon as it boils add 1 TB salt, stir and remove from the heat.  Add the rice noodles and set timer for 6 min.  After 6 min, check the noodles and continue checking until they are “al dente”.  When the noodles are done drain them and set them aside.

Meanwhile prepare the shrimp and scallions.  Put the peas in a small bowl, cover with water and ½ t. salt.  Cook in the microwave for 3 min., drain and set aside.

As soon as the noodles are drained put a wok or other large frying pan on high/medium heat.  When the pan is hot add the oil and sauté the shrimp for 1-2 min.  Add scallions and garlic, cook for 1 min.  Add noodles and peas, cook for 1 min. or until the noodles are warmed through.  Slowly add the sauce, using tongs to distribute it evenly.  Stir constantly until the sauce begins to boil around the edges of the pan.  Pour entire ingredients into a large warm bowl and garnish with fresh cilantro.  Serve immediately.

*Shrimp brine:  Dissolve a tsp. of salt in a bowl of cold water.  Add thawed shrimp and place in fridge for an hour.  Take care to drain it for a several minutes before cooking to help avoid “splatter” from excess water hitting the hot oil in the wok.

**Just about any noodle you like or have on hand will work in this dish:  chop suey noodles, soba noodles, angel hair pasta, linguini, etc.  So be creative and let me know what you try.


Wednesday, March 5, 2014

Cilantro 101


Imagine this:  You have just created a gorgeous dish, heavenly scents swirl around you and everyone is rushing to the table and salivating.  You reach into your fridge for a final dressing of cilantro, open the bag and find...cilantro sludge!  Ahhhhhhhhhhh!  Instead of bright Kelly green happy leaves full of flavor Swamp Thing is lurking at the bottom of the bag.


If this has ever happened to you dear reader follow along, I may have a solution for you.

First, when shopping for cilantro, or any leafy herb or vegetable, obviously look for bright deep color and no visible signs of dark or discolored leaves.

Second, after years of banishment retailers have re-installed those ridiculous spray thingies that catch  uninitiated shoppers with impromptu showers.  They are trying to create an illusion of "fresh" greens but this constant dousing actually breaks down the integrity of leafy things.  (Just think of the last time you couldn't bear to toss out the last serving of home grown lettuce lovingly dressed in your homemade vinaigrette and it turned to sludge by morning.)  Sitting around in water is not good for green things...period...so look for water damage.  It will look like pre-sludge, little dark spots.  Find the best bunch and shake out as much water as possible.  I often reach into the back of the pile to find any bunches that might be sheltered from the deluge.  

As soon as you unpack your shopping prep the cilantro.   Remove  the band holding the stems together and pick through the bunch separating anything discolored or suspicious looking.  Plunge the remaining stems in the cold water and swirl them around with your hands.  Then if you have a salad spinner, go for it and spin out as much water as possible.  If you do not have a spinner, drain the cilantro in a large colander in the fridge.  Set the colander on a plate to catch the drips and let it drain for an hour.

My antique salad spinner

Lastly, proper storage.  If you have ever bought a salad mix you may have one of these "boxes".  They are perfect for good greens storage so start stock piling right now.  (I use them for all my garden greens.)  

Recycled salad mix box--sparkling clean
Lay a folded paper towel in the bottom of the box to catch and retain any residual moisture.

Fresh bed for fresh greens
Simply place the prepped cilantro in the box, close it up and put it in the fridge.  The cilantro is washed and ready to use and will last for up to two weeks.  I use this method for parsley and all the greens I harvest  here throughout the season.

Happy cilantro, ready for action.
If you don't have any recycled boxes any glass or plastic container with a lid will work.  Just remember to make a lining with a paper towel.

It may sound like a lot of work but when it is done all at once it really does simplify things and you will have crisp foliage and stems full of flavor instead of scary slimy stinky compost.

If you love the zing of cilantro and are looking for a great recipe please clink on any of these links.
Some of these recipes are found on my bindweed farm blog, posted prior to my personality split.


Thursday, February 6, 2014

Chole Palak

Chole Palak
If you are lucky enough to live in Pocatello you can get the royal treatment and beautiful Himalayan cuisine at Taste of India and Nepal.  The menu is extensive and exciting.  I adore the Butter Chicken and cannot get enough of the spinach and chickpeas.  We don't live that far away but on cold dark winter days when the interstate is dangerous, I cook.  When the world outside is white and hostile it is soul warming to fill the house with spice and heat.
Last week was pretty bleak so I had a go at Chole Palak, chickpeas and spinach simmered in a savory tomato gravy.  It is not exactly like Mrs. Kasab's, but it'll do in a pinch and is made from ingredients I almost always have on hand.

Chickpeas (Chole)
Start with a can of chickpeas, rinsed and drained.  Set these aside and peel and chop some fresh ginger and rough chop a green chili--I like heat.  Put the ginger and chili into the blender with a can of tomatoes and spin them into a puree.

Cumin seed
Heat some canola oil in a heavy bottomed dutch oven.  When the oil is shimmering drop in a cumin seed, if it cracks immediately the oil is hot enough--add the rest of the seeds.

Coriander, turmeric and red pepper flakes
When the seeds are cracked, add the coriander, turmeric and red pepper flakes.  Cook for 30 seconds, just until the spices bloom and then add the tomato puree.

Oil and spices
The oil is hot and the tomato puree will spatter so be careful. (You may even want to remove the pan from the heat and then add the puree.)

Tomato puree
Cook this for about five minutes, stirring occasionally, until the tomato mixture begins to thicken and separate from the oil.
Tomato mixture separation
Then add spinach, salt and water.  Cook this with a lid on to make a savory gravy.  After about 5 minutes,  add the chickpeas.  Stir and taste, adjust the seasoning and if it is getting too thick, add a little water.  Simmer for 8 to 10 minutes. 

Spinach simmering in the tomato gravy
Finally add some garam masala, stir, make a final tasting to adjust the seasoning and serve in warm bowls.


Garam Masala (recipe below)

 Chole Palak

14 oz can tomatoes
1 TB ginger, peeled and chopped
1 green chili, rough chopped
3 TB canola oil
1 tsp cumin seed
1 TB coriander
½ tsp turmeric
½ tsp red pepper flakes
½-1 tsp salt
1 c. water
24 oz spinach, chopped (I used a bag of frozen, partially thawed)
15 oz can chickpeas, drained and rinsed
½ tsp garam masala

Puree the tomatoes, ginger and green chili in a blender.

Heat oil in a large heavy bottomed deep-sided pot.  Test the heat by adding one cumin seed to the oil, if the seed cracks right away the oil is ready.  Add the remaining cumin seeds when they crack, add the tomato puree, coriander, turmeric and red chili flakes.  Cook mixture three to four minutes on medium heat.  The tomato mixture will begin to separate from the oil and reduce to about half.

Add the spinach, salt and water.  Cook, covered, four to five minutes on medium heat.

Add the chickpeas and more water as needed to create desired consistency.  Cook on low heat for 8 minutes.  Add the garam masala, stir and serve.
 
Garam Masala:

2 TB cumin

2 TB coriander

2 t. black pepper

1 t. cardomom

1 t. cinnamon

¼ t. cloves


Put all ingredients into a small container with a tight fitting lid and shake to mix.  Store in a cool, dark cupboard.

This recipe was inspired by Manjula's Kitchen.

Wednesday, January 29, 2014

Honey Chili Lime Glazed Salmon

Don't you just adore friends bearing gifts--we do!  In his bachelor days RT did a lot of fishing, but sadly that came to an abrupt end when we started farming SERIOUSLY.  But every now and then an old fishing buddy will arrive with a few tales and other "fishy" stuff.  Last week a friend  traveling between Alaska and New Mexico stopped with the most gorgeous salmon filets!!

I am killer good at grilling salmon but it was way below freezing so I decided to broil it--NOT a good idea.  The heat was too close and too intense and the salmon overcooked.  HEARTBREAK.

Having another beautiful filet I did some heavy research and decided to bake it with a protective glaze to keep it moist and beautiful.  I found a great recipe for a lemon, mustard, parsley glaze at Natasha's Kitchen but I was out of  parsley and lemons, and who wants to go shopping on a beautiful Sunday afternoon!  I did however have fresh cilantro and limes so I changed it up a bit.
Honey Chili Lime Salmon glaze


Glaze before emulsion
I squeezed one and a half limes into this bowl, reserving a few slices from the center.  I poured in a good tablespoon of honey, added fresh minced garlic and a pinch of red pepper flakes,  chili powder, salt and pepper.  Tasting my concoction and deeming it perfect I added olive oil and whisked it into this beautiful emulsion.
 
Glaze emulsion

Roasted onion and cilantro infused EVOO--you can see the gorgeous filet just behind the bottle
 Our nephew gave us this amazing roasted onion and cilantro infused extra virgin olive oil--perfect for this recipe.  (See what I mean about friends bearing gifts!)  Any good tasting olive oil will do but I was just thrilled to use this gift.

Freshly minced cilantro
 I was not sure if the cilantro would survive the baking so I reserved it.  I popped a slice of lime onto each filet and put them in a hot hot oven, setting the timer for six minutes just to be safe.

Salmon filets glazed and ready for the oven
After six minutes I checked on the filets and re-glazed them.  I set the timer for another six minutes and warmed our plates.  I let the salmon cook for a total of 18 minutes and then let it rest another few before dressing each filet with fresh cilantro and a last little drizzle of glaze.
I paired the salmon with Roasted Vegetables with Moroccan Couscous.  
Perfetto!


Honey Chili Lime Glazed Salmon

Preheat oven 450.

2 limes
1-2 cloves garlic, minced finely
1 TB honey
½ tsp. chili powder
¼ tsp. red pepper flakes
salt and freshly ground pepper
1/3 c. extra virgin olive oil (EVOO)
1/3 c. fresh cilantro, minced
3-4 salmon filets

Line a deep-sided baking sheet with foil—seriously, do not skip this step.  Rinse and pat dry salmon filets with paper towels and set skin side down on the baking sheet. Sprinkle each filet with a bit of salt.

Slice the limes in half and make a slice for each filet.  Squeeze the limes into a small mixing bowl.  Add the garlic, honey, chili powder and red pepper flakes, a pinch of salt and pepper.  Stir to mix all ingredients and dissolve the honey.  Taste it at this point and adjust it to suit your tastes.

Whisk the EVOO into the other ingredients creating an emulsion, a lovely thick dressing type glaze.  Coat each filet with glaze, top with a slice of lime and bake for 6 minutes. 

After baking for 6 minutes, remove the baking tray and re-glaze each filet.  The thinner portions of each filet cooks faster than the thicker, so I moved the slices of lime to protect the thinner parts.  Return to the oven for another 6 minutes and continue to cook until done. 

When cooked through, remove filets from the oven and add another optional glazing and finish with fresh cilantro.


Tuesday, January 21, 2014

Roasted Vegetables with Moroccan Couscous


Sometimes a great meal comes from the strangest of circumstances, like lunch today.  I had a handful of mushrooms and a couple of broccoli crowns that were fresh this weekend and some rather sad lemons rolling around in the produce drawer.  Okay, roasted veggies--then I realized I am leaving the farm (gasp) for the weekend and wanted to leave a few morsels for RT.  Darling Sara sent us some beautiful spice blends that I have been dying to use and while digging in the pantry for them I found some Israeli couscous, a can of garbanzo beans and a box of somewhat tired raisins begging for use.  Voile!  

A culinary star is born--Roasted Veggies in Moroccan Couscous.


It couldn't be easier than this.  Preheat the oven to 375 degrees.  Clean and quarter the mushrooms and cut the broccoli into florets and put all the veggies in a large bowl.  Add the EVOO, lemon juice, a generous pinch of red pepper flakes and some salt and freshly ground pepper.  Stir it all up and let it marinate for a few minutes.

Line a baking sheet with foil and pour the veggies onto the sheet, making sure that they are evenly distributed.  Pop them in the oven and roast until the broccoli begins to caramelize, about 25 minutes.

Meanwhile open a can of garbanzo beans and rinse them in a colander with running water and leave them to drain.

Set a large sauce pan on medium heat and add a tablespoon of EVOO and the couscous.  Israeli couscous is a large couscous, about the size of a grain of barley. (If unavailable feel free to substitute barley or rice or quinoa.)  Toast the couscous until it begins to brown up, add the salt and Harissa and cook for another 30 seconds to let the spices bloom.  Add the water and bring to the boil.  Cover and reduce the heat and simmer the couscous until it is almost tender.  Add the raisins, cover and remove from heat.  Set aside and let couscous absorb any remaining water.

Pour some  balsamic vinegar into a small bowl and add the honey and garlic powder.  Stir this until the honey has dissolved.  Now is the time to taste the mixture and add more honey if you like.  Whisk in an equal amount of EVOO to create an emulsion--a perfectly mixed vinaigrette.

Now just put everything together in a large salad bowl and mix thoroughly together.  We had it warm for lunch, snacked on it in the afternoon at room temperature and put what little was left in the fridge overnight.  The next day RT scarfed up the rest right out of the fridge for his bachelor's lunch.

Roasted Vegetable Moroccan Couscous

8 oz button mushrooms, quartered
2 broccoli crowns (about 1 lb.), cut into florets
2 TB EVOO
juice of ½ lemon
pinch of red pepper flakes

14 oz can garbanzo beans, rinsed and drained

1 TB EVOO
1 c. large couscous (Israeli)
½ t. salt
½ t. Moroccan Harissa spice blend (recipe below)
1 ½ c. water
¼ c. raisins

1/3 c. balsamic vinegar
1-2 TB honey
¼ t. garlic powder
1/3 c. EVOO

Preheat oven 375.  Line a baking sheet with foil.  Place mushrooms and broccoli in a large mixing bowl, add 2 TB EVOO, lemon juice, red pepper flakes and mix thoroughly.  Pour veggie mixture onto foil lined baking sheet and sprinkle everything with salt.  Roast veggies in the oven for 20-35 min., until mushrooms are cooked through and broccoli is tender crisp and are beginning to caramelize.  (I like to catch it right before the broccoli burns!)  Remove from oven and return to large mixing bowl.  Add the drained garbanzo beans.  Cover the bowl with a large plate to let the veggies steam and marinate together.

While veggies are roasting warm 1 TB EVOO in a large sauce pan on the stove top.  Add the couscous when the oil is shimmering and toast the couscous for a few minutes, stirring frequently.  Add the salt and Harissa, letting the spices toast for 30 seconds.  Add the water and bring to the boil.  Cover the pan and reduce the heat to a low simmer for 8-10 min., keeping an eye on the water level and doneness of couscous.  When the couscous is almost tender all the way through, add the raisins, stir, recover, remove from heat and let couscous steam to finish the cooking.

Into a small mixing bowl add the balsamic vinegar and just enough honey to your liking.  (I like a nice balance between sweet and sour tangy.)  Add the garlic powder and whisk in the EVOO to create vinaigrette.  Add the couscous to the veggies and dress with the vinaigrette.  Serve warm or at room temperature.

I would love to have finished this with toasted walnuts, almonds or pine nuts and freshly chopped mint…but I did not have any so we did with out and it was divine.

**Harissa is a blend of herbs and spices mixed into a paste.  For this recipe I used a dry blend of spices.
1 tsp. chili powder
1 tsp. cumin
½ tsp. caraway seed
¼ tsp. cinnamon
¼ tsp. coriander
¼ tsp. cayenne pepper
Put all spices into a small jar with a tight fitting lid and shake to mix.  Store in a cool, dry, dark cupboard.  

This dish was inspired by Kevin at Closet Cooking.